
GitLab CI Workbook - Hands‑On CI/CD Essentials
A concise, practical guide designed for people who want to learn Gitlab CI essentials, step‑by‑step. Walks you through pipeline fundamentals, job orchestration, reusable patterns through templates and components, so you can confidently automate builds, tests, and deployments in any project.


Pipelines
Pipelines | .gitlab-ci.yml reference
The Gitlab CI feature creates a pipeline to run tasks according to the main Gitlab CI configuration file: the .gitlab-ci.yml.
Tasks that run inside a Gitlab CI/CD pipeline are called 'jobs' and run inside specific 'stages'. Stages are used to organize jobs execution. Jobs run inside 'runners' that should be available for the Gitlab project.
The list of 'stages' that are available for a Gitlab CI pipeline is declared inside the '.gitlab-ci.yml' file as follows:
stages:
  - sast
  - package
  - deploy
Each 'job' select the 'stage' where it should run and 'jobs' execution are performed sequentially according to the 'stages' order (e.g, jobs in sast stage run, then jobs in package stage run, then jobs in deploy stage run, etc). The 'jobs' of the same stage are by default executed in parallel.
Here is a screeshot of a Gitlab CI pipeline and its associated configuration:
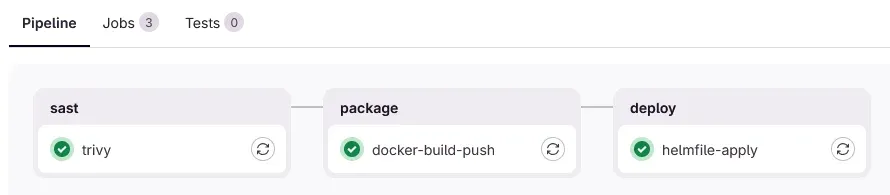
The '.gitlab-ci.yml' configuration for that pipeline:
# Stages definition

stages:
  - sast
  - package
  - deploy

# Jobs definition

trivy:
  image: alpine
  stage: sast
  script:
    - echo "Running Static Application Security Testing on the app code"

docker-build-push:
  image: alpine
  stage: package
  script:
    - echo "Packaging app"

helmfile-apply:
  image: alpine
  stage: deploy
  script:
    - echo "Deploying the app into Kubernetes"
We will learn more about Gitlab CI pipelines configuration in the next sections, keep reading.
Runners
Runners | Managing runners | Runners executors | Registering a runner
Jobs inside a Gitlab CI pipeline are executed inside runners. Runners are compute resources (physical or virtual machines, Kubernetes clusters, etc) that can register to a Gitlab instance at three different levels:
-
instance- the runner is registered for the whole Gitlab instance. All the projects inside that instance can see and use the runner. -
group- the runner is registered only for a specific group. Only projects inside that group can see and use the runner. -
project- the runner is registered only for a specific project. Only that project can see and use the runner.
Before registering and managing Gitlab runners, we need to understand the concept of runners executors.
When we register a runner to a Gitlab instance (using the gitlab-runner CLI or the configuration file), we need to specify an executor for the runner. The executor determines the execution environment for the jobs. Here are examples:
-
instance executor - jobs running inside a runner registered with the instance executor will have full access to the host instance, operating system, and attached devices. The jobs commands are executed inside a shell session directly in the host instance.
-
docker executor - jobs running inside a runner registered with the docker executor will run inside an isolated container. The container image that will be used to run the job is defined inside the job configuration. That executor requires the Docker daemon to be installed in order to be able to create containers for each job.
-
kubernetes executor - jobs running inside a runner registered with the kubernetes executor will run as pods inside a kubernetes cluster. Here you will find instructions to register a runner with the kubernetes executor to a Gitlab instance using a Helm chart.
For a complete list of Gitlab runners executors have a look at this.
For instructions about how to register and manage runners have a look at:
Jobs
A Gitlab CI job is the smallest compute unit of a Pipeline.
myjob:
  image: ubuntu
  before_script:
    - echo "Preparing script execution"
  script:
    - echo "single line command"
    - |
      echo "$message multiline command 1"
      echo "$message multiline command 2"
  variables:
    message: "Hello"
  tags: "myrunnertag"
-
The 'image' keyword should be used only when your runner is using a container technology as the executor (docker, etc).
-
If your runner doesn't use a container technology as executor and you use the 'image' keyword, it will simply be ignored
-
A job needs to contain at least the 'script' or 'trigger' keyword.
-
The 'variables' keyword can be used to declare variables that can be reused elsewhere inside the job (script, before_script, rules, etc).
-
The 'before_script', 'script' and 'after_script' keywords can be used to run commands from the specified 'image' container's shell.
Dotenv artifact
myjob1:
  image: ubuntu
  script:
    - echo "config1=value1" > $configfile
    - echo "config2=value2" >> $configfile
  variables:
    configfile: "config.env"
  artifacts:
    reports:
      dotenv: $configfile

# myjob2 can access variables declared
# inside the dotenv artifact from myjob1
myjob2:
  image: ubuntu
  script:
    - echo $config1
    - echo $config2
-
The 'artifacts:reports:dotenv' configuration creates an artifact containing the specified dotenv file.
-
The 'key=value' pairs variables declared inside the dotenv file will be transferred to subsequent jobs as environment variables.
Template
Overview and declaration
-
A Gitlab CI template defines configurations that can be reused by other jobs
-
A template can use all the keywords of a job
-
Therefore, a job as seen in the job section can also be used as a template, but the common way to declare a template is to create a 'hidden job' as follows:
.mytemplate:
  image: ubuntu
  tags: "myrunnertag"
  variables:
    message: "Hello"
Using the template in another job
Extends keyword | Reusing configurations with extends | Extends merge details
A job can use a template thanks to the 'extends' keyword as follows:
myjob:
  extends: .mytemplate
  script:
    - echo $message
Include templates from other files
Include keyword | Include local | Include project | Include components
Templates can be declared inside their own dedicated files and included inside other Giutlab CI configuration files as follows:
- Include a template located in the same repository and branch. The path you specify is relative to the directory where the file you are included the templates in resides:
include: 'mytemplates.gitlab-ci.yml'

# Can also be written:
include:
  - local: '/mytemplates.gitlab-ci.yml'
- Include a template located in a different repository inside the current Gitlab instance:
include:
  - project: 'my-group/my-project'
    file: '/mytemplates.gitlab-ci.yml'

# Another form for multiple files and
# branch other than the default one
include:
  - project: 'my-group/my-project'
    file:
      - '/mytemplate1.gitlab-ci.yml'
      - '/mytemplate2.gitlab-ci.yml'
    ref: "mybranch"
Templates containing multiple sections
You can also create templates containing multiple sections:
# File: templates.gitlab-ci.yml

.terraform-scripts:
  init:
    - terraform init
  plan:
    - terraform plan
  apply:
    - terraform apply
Referencing templates sections with !reference
The sections inside a template can be reused in other jobs thanks to the '!reference' keyword as follows:
include: templates.gitlab-ci.yml

terraform-plan:
  image: hashicorp/terraform
  extends: .terraform-scripts
  script:
    - !reference [".terraform-scripts", "init"]
    - !reference [".terraform-scripts", "plan"]

terraform-apply:
  image: hashicorp/terraform
  extends: .terraform-scripts
  script:
    - !reference [".terraform-scripts", "init"]
    - !reference [".terraform-scripts", "apply"]
Default settings and variables for all jobs
Configure global default settings
default:
  image: ubuntu
  tags: "myrunnertag"
  interruptible: true
-
The 'default' keyword can be used to configure global default settings that apply to all jobs that doesn't already have them defined.
-
If the default settings are already defined at the job level, the job definition takes precedence.
-
The list of configuration keywords that are supported by the 'default' keyword can be found at Default keyword supported values.
Configure global default variables
# Declare default global
# variables for all jobs

variables:
  APP_NAME: "myapp"
  APP_VERSION: "1.0.0"
-
The 'variable' keyword can be used to declare default variables:
-
for specific jobs when used at the job level
-
globally for all jobs when used at the top-level inside the Gitlab CI configuration file
-
Predefined variables
-
Gitlab CI 'predefined variables' are available for use by all jobs
-
For a full list of all the Gitlab CI 'predefined variables', have a loot at Gitlab CI predefined variables list
-
Here is the list of some of the 'predefined variables' that are commonly used:
CI_COMMIT_BRANCHCI_DEFAULT_BRANCHCI_COMMIT_REF_NAMECI_COMMIT_SHORT_SHACI_COMMIT_TAGCI_PIPELINE_SOURCECI_PIPELINE_URLCI_PROJECT_DIRCI_MERGE_REQUEST_IID
Control jobs executions with rules
The 'rules' keyword can be used to set conditions for which a job should be created or not. Most of the time you will need Gitlab CI predefined variables inside your rules. Here are examples:
  (...)
  rules:
    - if: $CI_MERGE_REQUEST_IID
    - if: $CI_COMMIT_BRANCH == $CI_DEFAULT_BRANCH
    - if: $CI_COMMIT_BRANCH
    - if: $CI_COMMIT_BRANCH && $CI_OPEN_MERGE_REQUESTS
      when: never
Control pipelines executions with workflow
The 'workflow' keyword can be used to set conditions for which a pipeline should be created or not. Here are examples:
# Create Merge Requests and branch
# pipelines while avoiding duplicates (two pipelines
# running at the same time after a commit in a Merge Request branch)

workflow:
  rules:
    - if: $CI_PIPELINE_SOURCE == "merge_request_event"
    - if: $CI_COMMIT_BRANCH && $CI_OPEN_MERGE_REQUESTS
      when: never
    - if: $CI_COMMIT_BRANCH
Running a set of jobs inside downstream pipelines
Imagine you have a bunch of apps to deploy. The Gitlab CI jobs that are required to deploy all the apps are identical and put inside a standardized 'deploy.yml'.
You want a pipeline that deploy 2 of your apps using that standard 'deploy.yml' CI file. One way to achieve that while keeping your pipeline well organized is to use downstream pipelines, that will give you something like this:
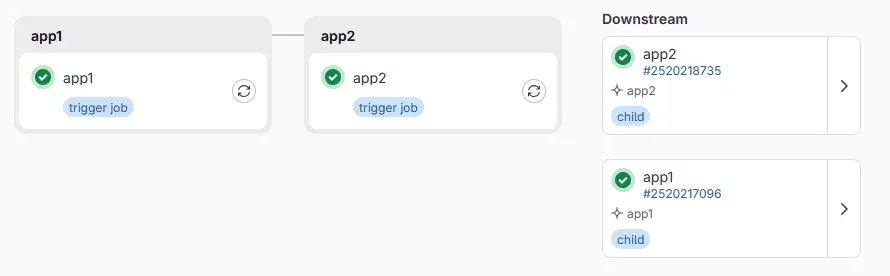
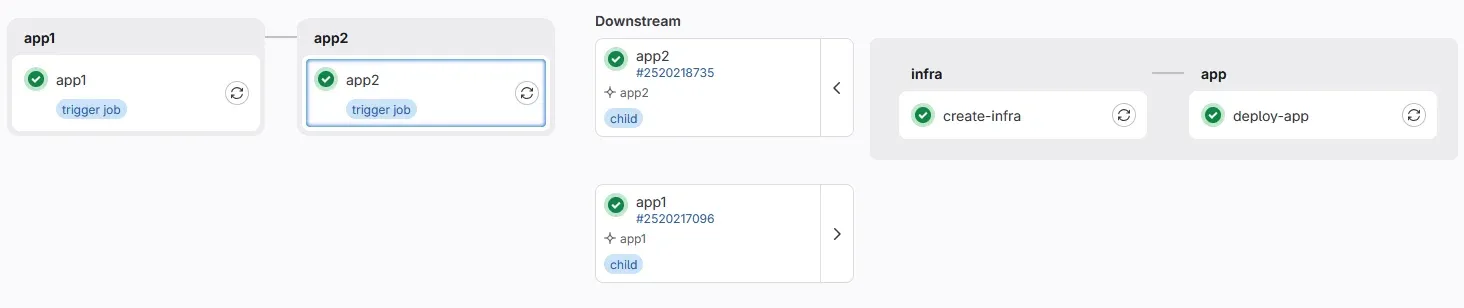
To create downstream pipelines, you use the Gitlab CI trigger directive. Here are example Gitlab CI configuration files used for creating the pipelines shown in the pictures above:
- standardized 'deploy.yml' file content
# deploy.yml

stages:
  - infra
  - app

create-infra:
  stage: infra
  script: echo "Creating $INFRA_TYPE infrastructure"

deploy-app:
  stage: app
  script: echo "Deploying app $APP_NAME into $INFRA_TYPE infrastructure"
- main '.gitlab-ci.yml' file content
# .gitlab-ci.yml

stages:
  - app1
  - app2

app1:
  stage: app1
  trigger:
    include: 'ci/deploy.yml'
    strategy: depend
  variables:
    APP_NAME: myapp1
    INFRA_TYPE: VM

app2:
  stage: app2
  trigger:
    include: 'ci/deploy.yml'
    strategy: depend
  variables:
    APP_NAME: myapp2
    INFRA_TYPE: K8S
Gitlab CI components
Components | Components best practices
Creating and documenting a Gitlab CI component
Here is a basic project structure you can use to create a Gitlab CI component:
.
├── .gitlab-ci.yml
├── README.md
└── templates
    └── component1.yml
    └── component2.yml
    └── ...
templates- the directory containing components files. One .yml file per component.README.md- the documentation of the components. Which components are available, how to use them from other projects, which inputs are available (name, description, type, etc)..gitlab-ci.yml- a classic Gitlab CI pipeline configuration file containing jobs to automatically test and release the components.
For all the available options about a Gitlab CI components project structure, have a look at this.
Now let's have a look at the structure of a component:
# Component: hello
# templates/hello.yml

# => First part: inputs

spec:
  inputs:
    name:
      type: string
      description: 'The name of the person to greet.'
    stage:
      description: 'GitLab CI stage to run the hello job in'
      default: 'test'

--- # don't forget these 3 dashes

# => Second part: component jobs

# Here you can use classic Gitlab CI jobs / templates / variables

# A template containing script functions that
# will be used by the component.

.hello-scripts: &hello-scripts |
  set -euo pipefail

  function log_info() {
      echo -e "[\\e[1;94mINFO\\e[0m] $*"
  }

  function log_error() {
      echo -e "[\\e[1;91mERROR\\e[0m] $*"
  }

  function assert_defined() {
    if [[ -z "$1" ]]
    then
      log_error "$2"
      exit 1
    fi
  }

# A template used to define rules for the hello job
# Could be overridden from inside projects that use this
# component to set custom rules for running the compoenents jobs

.hello-rules:
  rules:
    - if: $CI_COMMIT_BRANCH
    - if: $CI_MERGE_REQUEST_IID

# A job that will be created by the component
# Multiple jobs can be added

hello:
  image: ubuntu
  stage: $[[ inputs.stage ]]
  extends: .hello-rules
  script:
    - !reference [.hello-scripts]
    - assert_defined $[[ inputs.name ]]
    - log_info "hello $[[ inputs.name ]]"
Once the components are ready, we can automatically generate users documentation by using pre-commit and the labdoc pre-commit hook.
That way, we can easily regenerate the documentation after changes inside the components Git repository, just before committing.
Using a Gitlab CI component
To use a Gitlab CI component, we simply need to include it inside a '.gitlab-ci.yml' file as follows:
include:
  - component: "<gitlab_server_fqdn>/<path_to_component_project>/<component_name>@<component_version>"
    inputs: {}
Here is an example:
stages:
  - hello

include:
  - component: gitlab.com/hackerstack/skeletons/gitlab-ci-component/hello@1.0.0
    inputs:
      name: 'gmkziz'
      message: 'You are doing a great job here!'
      stage: 'hello'
Testing and releasing a Gitlab CI component
Now let's add a test and release pipeline inside the components project by creating a '.gitlab-ci.yml'. Here is the content:
# This makes a pipeline run when there is a commit on any branch
# and avoid duplicated jobs in Merge Requests branches
workflow:
  rules:
    - if: $CI_PIPELINE_SOURCE == "merge_request_event"
    - if: $CI_COMMIT_BRANCH && $CI_OPEN_MERGE_REQUESTS
      when: never
    - if: $CI_COMMIT_BRANCH

# Here we define the stage of the pipeline
# test will be used to run a job that test the component
# publish will be used to run a job that creates a version tag
# for the component and associates a release to it.
stages:
  - test
  - publish

include:
  # Here we call the component with the latest commit sha as the version
  # That way, we test it on each new commit inside the project
  - component: $CI_SERVER_FQDN/$CI_PROJECT_PATH/hello@$CI_COMMIT_SHA
    inputs:
      name: 'gmkziz'
      message: 'You are doing a great job here!'
      stage: 'test'

  # Here we use a semantic-release component to ease the release process
  - component: $CI_SERVER_FQDN/to-be-continuous/semantic-release/gitlab-ci-semrel@4.1
    inputs:
      # Make semantic-release job runs automatically, manual by default
      auto-release-enabled: true
To make the semantic-release component works, you should add a 'GITLAB_TOKEN' variable inside your project CI/CD variables as described here. For more about semantic-release have a look at this.
We can also make the components appear inside the Gitlab CI/CD catalog by following instructions here.
Here is a component I have published inside gitlab.com CI/CD catalog.
Other Gitlab CI features
Parallel matrix
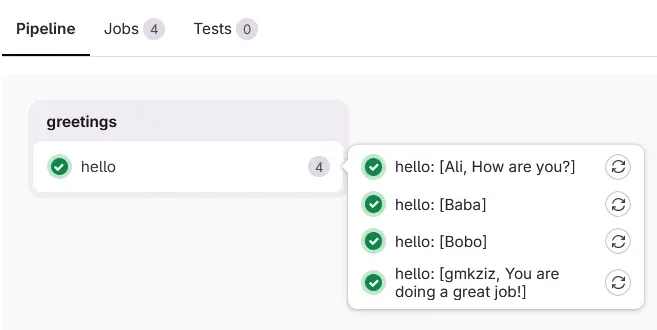
You can use Gitlab CI 'parallel matrix' feature to run a job multiple times in a single pipeline with different variables values for each instance of the job.
Here is an example:
stages:
  - greetings

hello:
  image: alpine
  stage: greetings
  script:
    - echo "Hello $NAME. $MESSAGE"
  parallel:
    matrix:
      - NAME: 'Ali'
        MESSAGE: 'How are you?'
      - NAME: 'gmkziz'
        MESSAGE: 'You are doing a great job!'
      - NAME: ['Bobo', 'Baba']
Result:
Scheduled pipeline
You can use Gitlab CI 'scheduled pipelines' feature to run pipelines at regular intervals based on cron patterns. Use pipeline schedules for tasks that need to run on a time-based schedule rather than triggered by code changes.
Pipeline inputs
You can also use Gitlab CI inputs to ease the creation / configuration of pipelines for specific purposes. When a user creates a new pipeline using 'Pipelines -> New pipeline', the inputs will show, available for configuration.
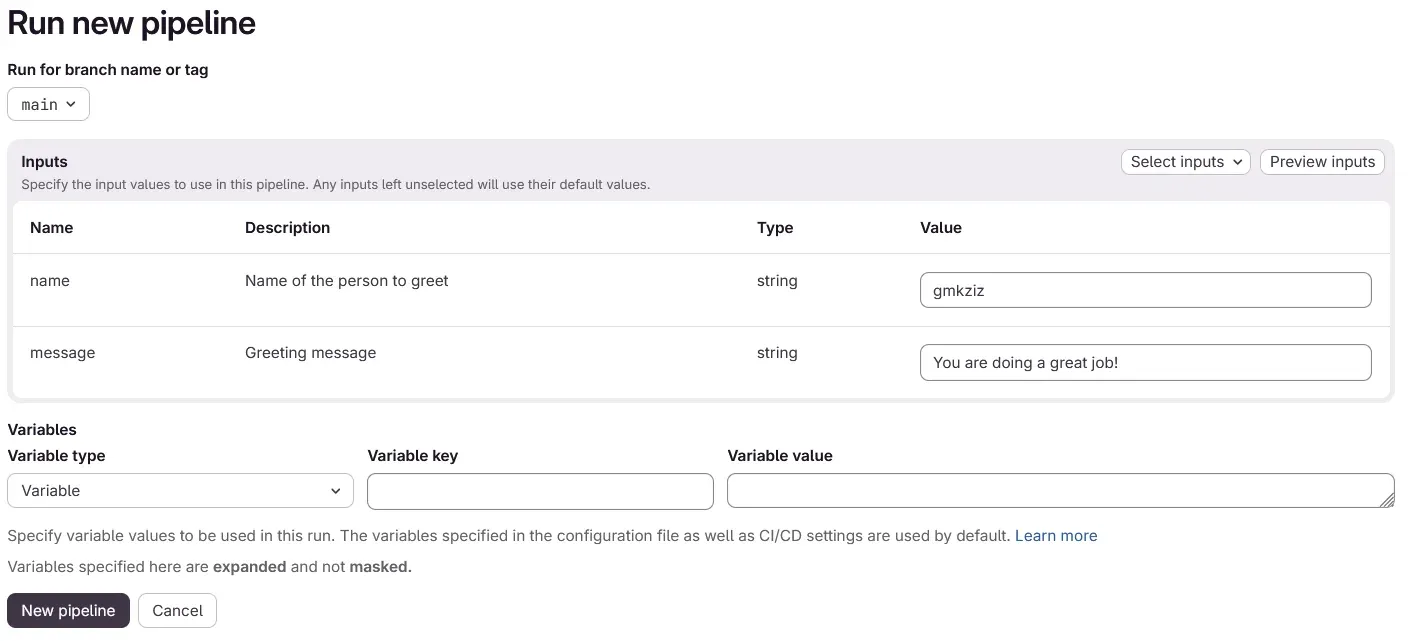
Here is the associated Gitlab CI configuration:
spec:
  inputs:
    name:
      description: 'Name of the person to greet'
      default: 'gmkziz'
      type: string
    message:
      description: 'Greeting message'
      default: 'You are doing a great job!'
      type: string

---

stages:
  - greetings

hello:
  image: alpine
  stage: greetings
  script:
    - "echo Hello $[[ inputs.name ]]. $[[ inputs.message ]]"
Gitlab CI functions
Gitlab CI functions feature provides reusable units of CI/CD job logic that replace the script in a Gitlab CI/CD job. This is currently an experimental feature subject to breaking changes.